Using the Calendar
The calendar is the heart of Coachbox. Here you see all planned and completed training in a clear weekly format.
Calendar Features
Week View
The calendar displays a weekly view by default with:
- Days of the week - Monday to Sunday in columns
- Workouts - Planned and completed workouts per day
- Annual plan - Training period and focus for the week
- Totals - Weekly statistics on the right side
Training Types
Workouts are displayed with color coding:
- Swimming - Blue
- Cycling - Green
- Running - Orange
- Strength - Purple
- Other - Gray
Workout Details
Each workout card shows its title plus a set of metrics, for example duration, distance, average pace or power, and heart rate. Which metrics appear, and in what order, is up to you: see Choosing what each card shows below.
Display options
The filter button (the sliders icon, top right) opens a panel with three columns:
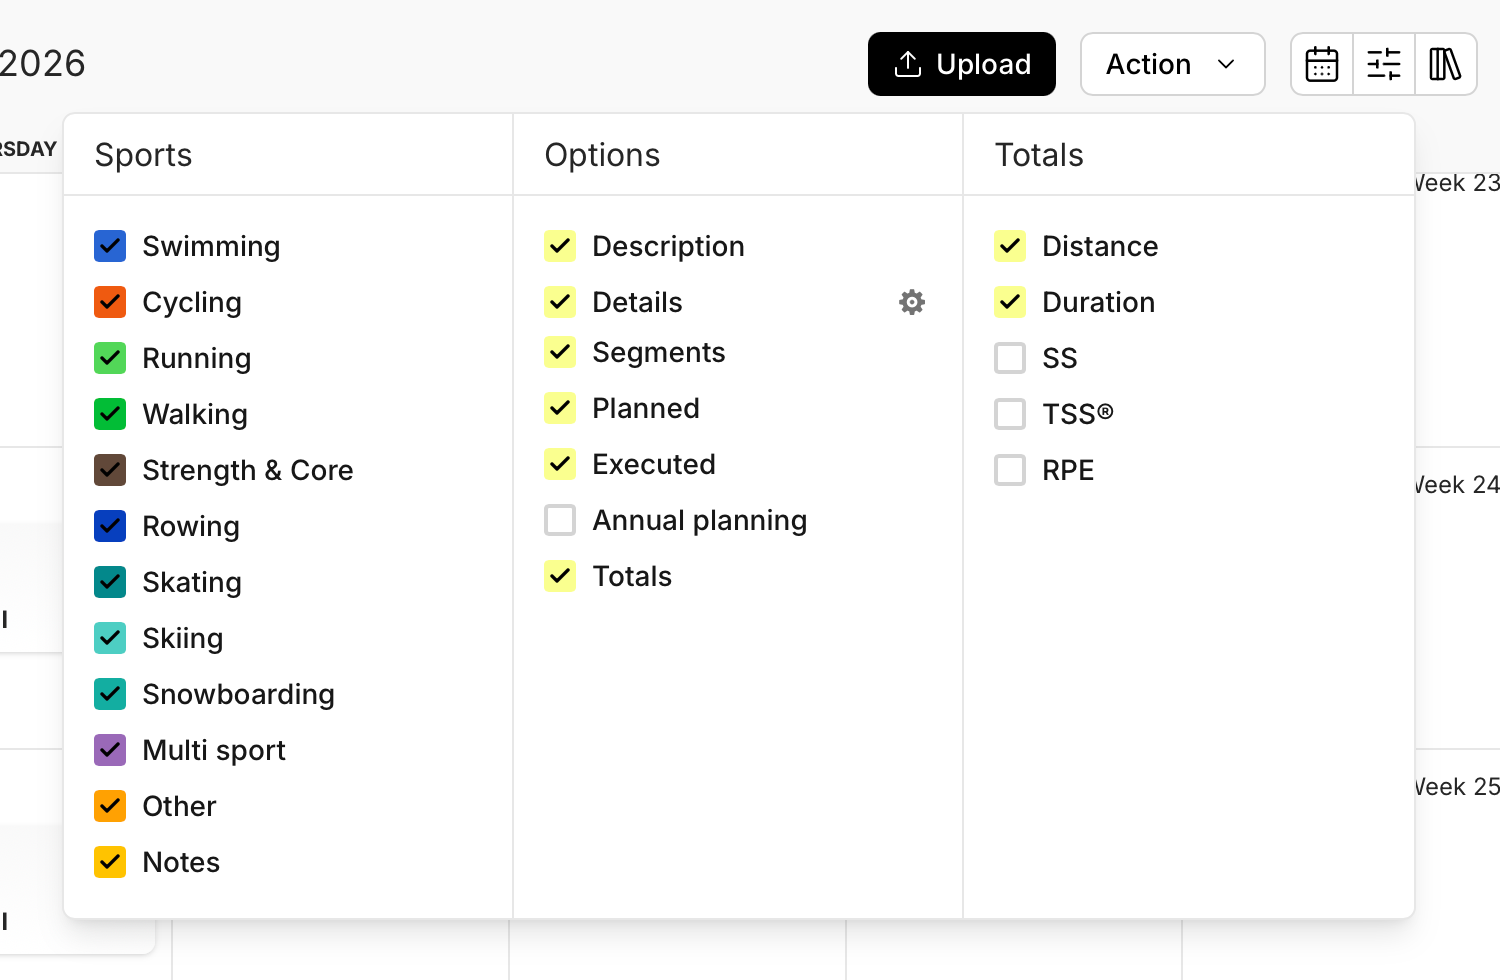
- Sports: show or hide each sport, and notes.
- Options: what each workout card shows, such as the description, segments, the planned/executed values, and Details (the workout metrics).
- Totals: which weekly totals appear in the rightmost column (distance, duration, SS, TSS, RPE). These are week totals, separate from the metrics on the individual cards.
Choosing what each card shows
Details turns the metrics on the workout cards on or off. When Details is on, the gear icon next to it lets you pick exactly which metrics each card shows, and in what order, per sport.
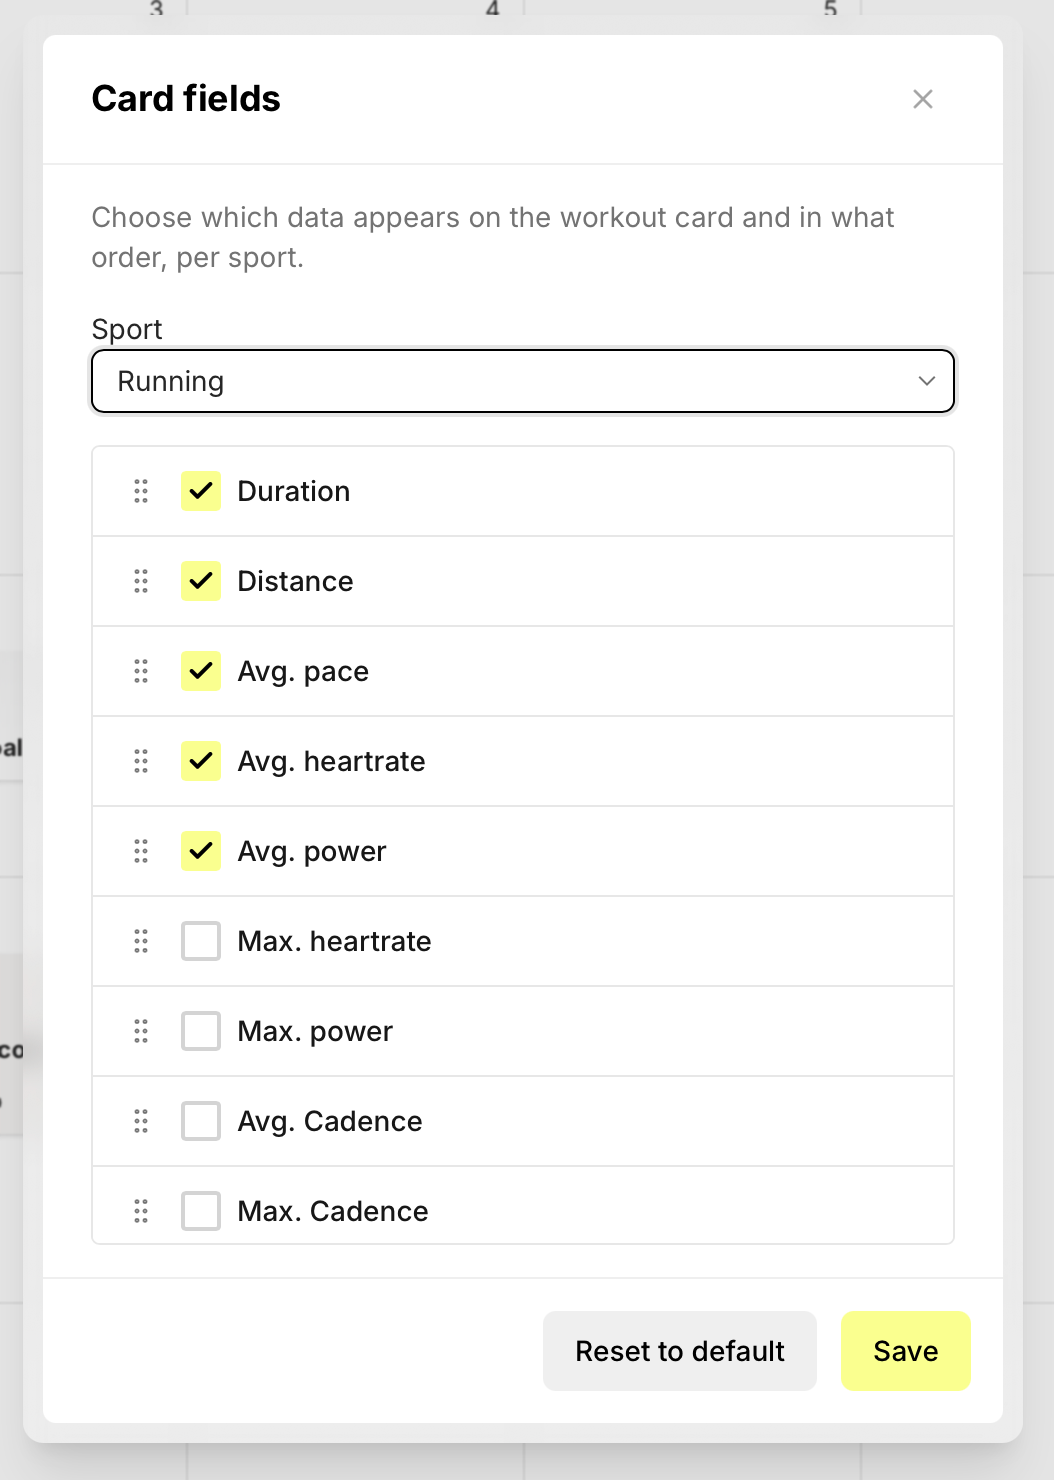
- Open the filter panel (sliders icon) and make sure Details is on.
- Click the gear icon next to Details.
- Pick the sport you want to configure at the top.
- Check or uncheck fields. Besides duration, distance, pace/speed, heart rate, power and cadence, you can also add Stress Score (SS), TSS and RPE.
- Drag the rows by the handle on the left to change the order they appear on the card.
- Click Save. Use Reset to default to restore that sport's standard set.
Good to know
- The selection is saved per sport, so you can show different metrics for cycling than for running or swimming.
- A metric only shows when the workout actually has a value for it, even when it is checked.
- This is separate from the field selection inside a workout's detail screen. To change the fields you fill in or see when you open a workout, see Customizing workout fields.
Viewing daily metrics
Besides workouts, the calendar also shows the daily metrics: sleep, HRV, resting heart rate, weight, steps, Body Battery and more. That way you see at a glance how an athlete is absorbing the training, not just what they covered.
When an athlete wears their device outside training too, those values arrive automatically from the connected platform. No extra connection or setting is needed. You can also fill them in yourself.
Body Battery is the exception: that value only arrives through synchronisation with Garmin devices that report this measurement, and cannot be filled in manually.
Where to find them
On every day that has metrics, a small label icon appears next to the day number, in the top right of the day cell.
- Click the icon for an overview of that day's values. When the day has Body Battery data, that overview also shows the course of the day as a small chart.
- Double-click to open the detail screen, where you can add or correct values.
- No icon means there is no data for that day.
To add metrics yourself, right-click a day and use the same label icon in the menu.
Good to know
- To follow the evolution over time, use the athlete's statistics, where weight, sleep, resting heart rate and HRV are plotted.
- When an athlete wears several devices, Coachbox takes the daily metrics from one chosen platform. The athlete picks that themselves: see Daily metrics.
- As a coach you see an athlete's metrics in their calendar, but you do not change their metrics platform for them.
Navigation
Navigating Through Time
- Use the left and right arrows to navigate between weeks
- Click Today to return to the current week
- Select a specific date via the date picker
Actions
- Upload - Manually upload an activity file
- Action - Perform bulk actions on selected workouts
Adding a Workout
Right-click on a day to add a new workout:
- Choose the workout type (swimming, cycling, running, etc.)
- Fill in the workout details
- Save the workout
Moving and copying a workout
Drag a workout card to another day to move it. To copy it instead, hold a key while you drag:
- Press and hold Option (⌥) on a Mac, or Alt on Windows.
- Drag the workout to the day you want.
- Keep the key held down until you release the mouse button.
While the key is held, the cursor shows a small plus sign. That is your confirmation that the workout will be copied instead of moved.
Good to know
- The key has to stay pressed for the whole drag, not just before you start. Release it too early and the workout is moved.
- It is Option or Alt, not Command or Ctrl. Command does nothing here.
- Dropping a workout on top of another workout card merges the two into one.
- Notes behave the same way: drag to move, Option or Alt to copy.
Copying to another athlete
Dragging works within one calendar. To copy a workout, or a whole week, to another athlete, use the toolbar:
- Tick the workouts you want to copy. A full week is fine.
- Click Action in the toolbar and choose Copy items.
- Leave Users selected and pick one or more athletes. Under Groups you select an entire athlete group in one click.
- Enter a New start date and confirm with Copy.
The workouts land from that start date onwards and keep the spacing between them. Copy a Monday-to-Sunday block onto a Wednesday and the block runs Wednesday to Tuesday for the other athlete.
Pick Work Sheets instead of Users in step 3 to copy to another work sheet of the same athlete. Moving works the same way, through Move items.
What happens to the zones
A structured workout built on training zones is converted to the zones of the athlete receiving it. Copy an endurance run to a slower athlete and they get their own pace per block, with the stress score moving along. The workout no longer shows the numbers of the athlete it was originally built for.
The same goes for the totals Coachbox works out from the blocks: which ones those are depends on how you built the session. See which totals end up on the card.
This only works when the receiving athlete has zones for that sport on the date the workout lands. Without them the blocks still arrive, but Coachbox cannot calculate a pace or a stress score for them. The other reasons a stress score stays empty are covered under the Coachbox Fitness Trend.
Viewing a Workout
Click on a workout to open it and see more details:
- Full workout description
- Interval structure
- Analysis charts (for completed workouts)
- Planned vs. completed comparison
Quick actions via right-click
Right-click a workout card for quick actions like analysing, printing and exporting, without opening the workout first.
Marking a planned workout as not executed
Sometimes a planned session does not happen. Instead of opening the workout and changing the field, right-click the card and choose Mark as not executed. The workout stays in the calendar but counts as missed. The same way, Mark as planned sets it back.
Splitting a workout
When an athlete swaps two sessions, say Sunday's long run on Saturday, the synced activity lands on the planned workout of the wrong day. The two are merged into one card, and the planned session the athlete still needs for Sunday is no longer free. Splitting separates them again, so the planned session can be moved to the right day.
Coaches and athletes can both split a workout:
- On the web platform: right-click the workout card and choose Split workout.
- In the Coachbox Mobile app: swipe the workout in the calendar and tap Split. Make sure the app is up to date.
The planned part and the executed part are then two separate workouts on the same day. Drag the planned one to the day it belongs to.
Good to know
- Split only shows on a workout that holds both planned and executed data. A workout that is only planned or only executed has nothing to split.
- The opposite also exists: dropping a workout on top of another card merges the two.
- As a coach, the right-click menu also offers Remove planned data and Remove executed data, which delete that part instead of keeping it as a separate workout.